Your kitchen is the perfect place for baking memories. And it’s also a great place to mix some science and math knowledge into your baking activities.
Want to learn this holiday season while you’re in the kitchen? Download our FREE ebook, Baking Spirits Bright!
Your final decorations bring festive colors to your cookie plate, but the smells, tastes, and textures of your cookies will largely depend on the math and science that followed them from ingredients to presentation. Let’s look at the math and science behind your favorite family recipes. Baking is an activity that calls for accuracy in a kitchen. Your recipe is a formula for success; it’s kitchen chemistry in its finest form. If you wonder why your cookie crumbles, it’s probably because you didn’t measure your ingredients properly or follow the directions as they were written.
There are 2 main ways to measure ingredients in the kitchen. One way is to weigh your ingredients. The other is to scoop a set volume amount. As you might imagine, the first method uses a kitchen scale, while the second uses measuring cups and spoons. Both methods are tried and true, and the decision is typically made by the recipe itself and how it was written.
One advantage weighing has over scooping is that certain dry ingredients, such as flour, tend to settle as it sits. That means that it gets more dense or compact. If you’ve ever had a recipe that calls for sifting your flour first, this is to add the air back into the scooped volume. We’ll find out later why air is an important ingredient in baking.
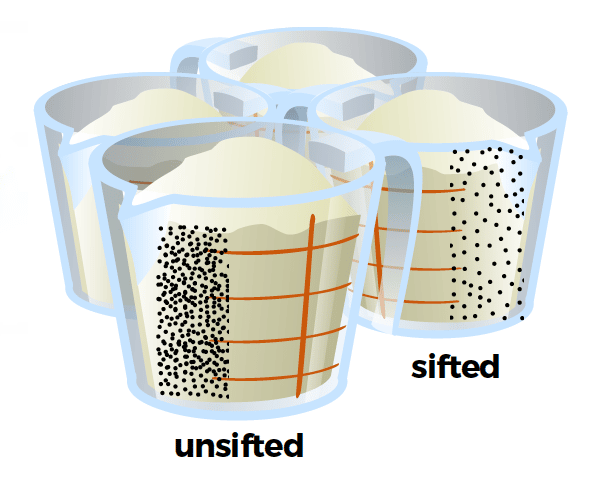 Weighing isn’t affected by the air because air does not contribute to weight. If your recipe calls for ounces, it doesn’t matter if your flour is sifted or not. 1 ounce will always weigh 1 ounce. But 1 cup of sifted flour weighs about 4 ounces, and 1 cup of unsifted flour weighs about 4.5 ounces. Sifted flour has more air and less flour in it. You will always have a certain amount of variability if you use volumetric measurements in your kitchen.
Weighing ingredients gives a baker accuracy in measurement. A weighed amount will always give you the same amount of ingredients each time you bake. Volumetric measurements that call for scooping ingredients can vary each time you bake, depending on the ingredients themselves and your scooping technique.
If you don’t have a kitchen scale and your recipe is written in scoops, it’s best if you pour the ingredient into the measuring cup or use a spoon to scoop it in smaller amounts. Dipping your cup measure into the flour bag to fill it might seem like the quickest method, but you risk compacting your ingredients and getting more than your recipe needs.
Interestingly enough, some recipes do call for compacting ingredients. Often you will see a recipe that calls for 1 cup of firmly packed brown sugar. In this instance, the recipe wants you to add the ingredient, use a spoon to push it firmly down, and add more until your cup is firmly packed.
Measuring ingredients is just one-way math and science come into play in the kitchen. Let’s take a deeper look at the ingredients themselves, ingredient temperature, and mixing order of your ingredients. Does all of that matter? You bet it does! You can have the finest ingredients measured out with accuracy, but if you don’t control your ingredient temperatures and the order they are mixed together, you could have a problem with your bake.
Every ingredient in your cookie matters, but some ingredients give you lots of options within themselves. Flour is one of these ingredients. The type of flour you use in your cookie will decide if your cookie is tender, tough, or crumbly. Flours that have more protein in them, like all-purpose flour products, can form more gluten.
Gluten makes a baked product strong so that it can better hold its shape. Adding water to your flour and mixing it in allows 2 proteins called glutenin and gliadin to bond with each other and form gluten. The amount of protein in your flour will determine how much water it can absorb. Why is this important? Well, it’s the difference between a soft, sticky dough and a bowl full of flour soup! If you are substituting a low-protein flour, you should be watching closely to see if you will need to adjust the amount as you are mixing to get a good cookie consistency.
If your cookies consistently crumble or spread flat when they shouldn’t, you should consider a flour that has more protein. Even all-purpose flours have varying amounts of protein in them, so if you find a brand you like, be sure to remember the name. If you’re feeling adventurous or looking for a way to remove flour from a recipe, you can consider using a nut meal which is essentially finely ground nuts. Peanut butter cookies often have minimal ingredients relying on nuts, eggs, and sugar to give the cookie its shape and texture.
Holiday cookie-cutter cookies bake well with cake flour. Your sugar cookies will stay white and keep their shape so that you can have fun decorating them as you wish.
It’s a key ingredient in many bakes. With its golden color, you can think of it as the Goldilocks of your recipe. Not too hot and not too cold; you need it just right to get the creaminess that most cookies need. That typically means room temperature or small cuts of cold butter. Very few cookie recipes call for melted butter. Fats (and sugars) interfere with gluten formation. You might be tempted to think this is a bad thing given what we’ve just learned, but it isn’t. They are necessary for a tender cookie.
Most cookie recipes tell you to cream your butter and sugar to start. What’s a good creaminess? Well, if you want dense cookies that will hold their shape, mix your butter and sugar at a lower speed and stop when they are a smooth paste. If you want a crumbly cookie that spreads thin in the oven, mix your butter and sugar on a medium speed. Sugar trapped in the butter will aid in creating air pockets when your cookie is baked and the butter melts. More mixing creates finer air pockets and a fine crumb when baked.
If your cookies are spreading more than you would like, consider substituting shortening for the butter in your recipe. Butter melts immediately in a hot oven and contributes to the cookie spread. Shortening on the other hand will keep its texture over a greater range of temperatures. Because of this fact, cookies made with shortening will hold their shape better than those made with butter.
Choosing between butter and shortening isn’t always easy because you do give up the taste of real butter when you make the substitution. However, science is always willing to offer a solution, and these days butter-flavored shortening could be the answer to your cookie dilemma.
Just like flour, sugar comes in lots of different types and the type you choose will influence how brown your cookie bakes and its final texture when you bite into it. Large amounts of sugar can make a cookie crisp and firm, while smaller amounts make it tender. Brown sugar, maple syrup, and honey also moisten cookies differently than your typical crystalized sugar. Powder sugar, also called confectioner’s sugar is super fine and typically used in icings or sprinkled on top of cookies before they are presented.
If you are making a cracked-surface cookie, like a gingersnap, consider using a coarse or turbinado sugar. These sugars dissolve slowly and migrate better to the surface which promotes the cracking you seek. And speaking of cracking…
Eggs are found in nearly all baked goods. These days you’ll find a huge variety of eggs at your local grocery store. If your recipe doesn’t distinguish a type of egg, you should assume that you will be using large eggs. But what egg-actly are they doing in your cookie? There are really 3 ingredients available in 1 egg. Most recipes call for the whole egg which is the yolk and egg white. Egg yolks only will make a cookie tender. Egg whites only will dry and crisp things up.
Eggs are just as important as flour when it comes to giving your cookie its structure. Anyone making a meringue cookie knows this. There’s definitely science behind the temperatures, mixing techniques, and time required for a beautiful meringue that doesn’t shrink, crack, or puddle.
Eggs are also good at binding your ingredients, especially oil and water. Oil and water are 2 things that typically do not mix, but eggs hold them in an emulsion which is like a cloudy mixture of both. Nobody likes a cookie that isn’t mixed evenly. You want your flavors to be evenly distributed throughout your cookie.
How do you crack your eggs? Most people typically smack the egg on the side of the mixing bowl or countertop. There is some science, however, behind cracking an egg on a flat surface to reduce pieces of shell and thus the likelihood of having some shell drop into your dough. Give it a try the next time you are baking to see if this technique works for you.
It’s important to be aware of the temperature of other items in your recipe if you’re using eggs. For example, add eggs to a heated liquid like milk and you’ll get scrambled eggs instead of cookies. A better rule of thumb is to slowly add and mix the heated liquid to your eggs.
If you stop to think about it, baking a cookie is all about creating something new out of ingredients which are like building blocks. Some ingredients, such as flour and eggs contribute to the actual structure of your cookie. They help it hold its shape. Other ingredients like sugar and fat give your cookie the tenderness that most of us enjoy when we bite into the cookie. But did you know that how you combine the ingredients determines how your cookie will hold its shape and taste?
Mixing your ingredients ensures that they are all evenly distributed. It also adds air to your recipe, giving your cookie a porous (think less dense) structure. The next time you are mixing your ingredients, you can say, “Now it’s time to add the air.” Whip, cream, knead, fold, and sift may all sound like arbitrary baking terms, but they are really scientific ways to ensure your baking has the proper structure and aeration needed to be successful. Hmm, does mixing do anything else? I hope you said yes.
Think about each of your ingredients. Would you eat any of them raw from the measuring cup? It’s probably not a good idea. But when you take them, mix them, and bake them, you get something completely different from your starting point. Where did that magic happen? It started in the mixing bowl. A lot is happening as your mixer is spinning around and around.
Have you ever seen smooth rocks that were worn down by water continually flowing over them? Well, your mixer is breaking down the larger particles and molecules of your ingredients. And until those dry molecules dissolve into the liquids, they can’t behave properly. This is why most recipes call for some amount of water. Flour, sugar, salt, baking powder – all of them need to dissolve first.
That last fact brings us to our last ingredient that we are going to talk about, and it’s an important one. Leavening agents can make your cookie rise up and make you a star baker. Or they can leave you feeling flat and deflated. It’s important to understand them well.
You already added air bubbles to your dough when you mixed your ingredients together, but that’s usually not enough. Leavening agents cause gases to form and expand your dough. Now here is an important fact. Leavening agents do not add a single new air pocket to your bake. They expand the air pockets you created when you mixed your dough.
Some of this reaction starts in your mixing bowl and some of it continues as your cookies heat up in the oven. This is why you don’t typically leave your dough sitting out for a long period of time before you bake it. If you’ve measured out all of your other ingredients properly, your cookie dough will be tender enough to stretch as the gases expand and yet strong enough to dry out and hold its structure as it bakes firm.
Physical leaveners, like steam, expand when heated and push on the dough causing it to swell. Steam can come from water that you added to your dough, or it can be from other ingredients that contain moisture like milk or eggs and even butter.
Biological leaveners as you might guess come from living things such as yeast. These organisms produce carbon dioxide which is also a gas that will expand your dough. They work their magic before you put your dough in the oven because they die in the high temperatures. This is why you let dough with yeast rise before you bake it.
Chemical leaveners, such as baking powder, also create carbon dioxide but it is through a chemical reaction. This happens throughout the baking process.
All of the gases produced through these leavening agents enlarge the air pockets you created when properly mixing your cookie dough. That’s why mixing your ingredients well is so important. If your air pockets didn’t exist, the gases produced by your leaveners would escape your cookie and leave your dough flat.
As a rule of thumb, 1 teaspoon of baking powder or 1/4 teaspoon of baking soda is enough to leaven 1 cup of flour. More isn’t necessarily better. If your bubbles grow too big, you risk them rising to the surface of your cookie and popping. Now that defeats the purpose!
Self-rising flours have a leavening agent already mixed in. This is a good thing if you don’t bake often and have fresh ingredients readily available. It’s probably worth noting that most self-rising flours are lower in protein content.
Leavening agents also affect the acidity of your dough. If you want a cookie that browns on the bottom, use baking soda. It will neutralize acids and allow your cookie to bake longer.
You’ve measured your ingredients carefully. You mixed them in the proper order to ensure that all of your ingredients dissolved evenly and air pockets were formed. It’s now time for the fun to start.
Depending on the cookie you are making, you can scoop cookie dough directly onto your cookie sheet, pipe it into a shape, roll it into a ball, slice it, or roll your dough out for cookie cutters.
If you want evenly proportioned cookies, consider using an ice cream scoop to measure out your cookie dough.
If you are using cookie cutters, it might be helpful to chill your dough in the refrigerator before you start. This helps the butter and any other fats solidify a bit, making it easier to roll, cut, and lift your shapes onto your cookie sheets. It also gives your dough time to have moisture evenly spread. This prevents sticky spots or dry ones that tear easily. Coating your work surface with a dusting of flour also helps you maintain the cookie shape.
I’m guessing you’re ready to start baking. There are 3 ways that heat is transferred from its source, your oven, to your cookies.
Radiant heat is transferred through space from a warmer object to the surface of a cooler object. The molecules on the actual surface of your oven absorb the heat that your oven generates. This makes them vibrate faster. Eventually the heat causes molecules away from the initial source to vibrate faster, reaching your baking materials.
So, there’s a lot of movement going on, but you won’t see it because it is at the molecular level. Now, how does this movement actually change your gooey dough into a delicious cookie? The vibration causes frictional heat within your cookie! Here is the amazing part; your oven never touched your cookie and yet the heat was transferred. Science is pretty cool!
Conduction happens at the level of your cookie sheet. Heat always passes from a hot area to a cooler one. Of course, you already knew that, right? Direct contact is needed for conduction to occur. Your cookie sheet will heat up before your cookies and will continue to share the heat until your cookies and cookie sheet are the same temperature. Why is this important? Well, if you’ve ever left cookies on the cookie sheet after they have come out of the oven, they are still technically cooking. This is why most recipes call for you to transfer your cookies to a cooling rack.
If possible, it’s best to use a layer of aluminum foil or parchment paper between your cookie tray and cookies. This allows you to remove your cookies immediately after they leave your oven. If you decide to bake directly on a cookie sheet, don’t remove your cookies immediately. This can cause them to fall apart. Ideally you should wait 1 to 2 minutes for them to easily lift off. Waiting longer than this time period runs the risk of your cookies sticking to your cookie sheet. Don’t try to scrape a spatula underneath them at this point, simply reheat them for a minute before you lift them.
Convection occurs because of liquids and gases (these conduct heat slowly). Warmer liquids and gases, as you know from your chemistry studies, are less dense; the molecules are farther apart. They will rise. Cooler liquids and gases are denser and will sink. So, think about what this means. There is constant movement! It’s like an invisible spoon stirring the air. The warm air rises; the cool air sinks – continuously! In a convection oven, there is typically a fan that circulates the hot and cold air. With convection cooking, temperatures typically do not have to be as high and there are shorter bake times.
Ultimately, you want to bake your cookies at a temperature that allows the outside to brown, but not at a speed that doesn’t allow the heat to reach the center of your cookie. No one likes a cookie that is overbaked or underdone. Your oven, baking sheet, and position within the oven will all contribute to the final outcome.
 Rachael Yunis is an avid baker and keeper of her family’s heirloom recipes. She is the Director of Apologia Science and Math departments, author of the Apologia Young Explorers book titled, Exploring Creation with Earth Science, and co-author of the Apologia textbook, Advanced Biology: The Human Body. Together with her husband, Sam, a retired NASA engineer, they homeschooled their children through high school. Their grown kids now work in aerospace and computer science fields.